I got into collecting records recently, and boy was that a bad decision for my wallet! But no matter, the task at hand is to update the player I bought and see if I can't make it better! Nicer case, put in a battery, this could end up being quite nice!
So, what is wrong with the player I got? The player I have is this little number from amazon, and it's very eh. It has three main problems, one being that it has to be plugged in if you want to use it, rendering the "portability" selling point kind of moot. Even if you always had an outlet, you'd still have to carry around a plug with a ugly ac to dc converter. Second, it is smaller than a record. This means that it can't support all parts of the record, just a small-diameter circle under it. The edges of a 12" record hang over and it's stressful. This also means the case can't have records stored inside of it. That isn't too bad in its current state, but if I can give it a battery then it makes sense that the hard case protecting the player should also be able to protect a couple LPs. And third, the thing is just kinda built like crap. The case is particle board and most of the screws holding the player to the case have actually snapped, and I can't fully get them out of the pine columbs it's mounted on. All in all, I want to put a battery pack in it so I can take it places, and I want to mount it all in a new case that is at least 12" by 12" on the inside so I can keep records safe, as well as maybe have a real platter under the record.
And that is what this page is for, to chronicle part of this adventure and hopefully help someone else make their own player better! Or at the very least be an impressive page for someone who is checking my resume to peruse.
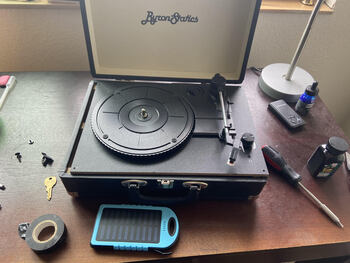
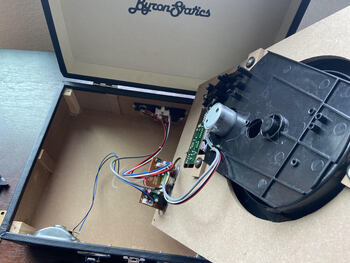
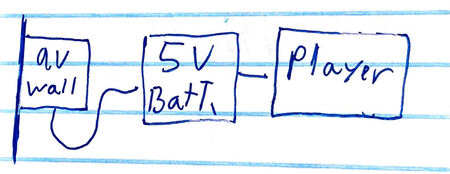
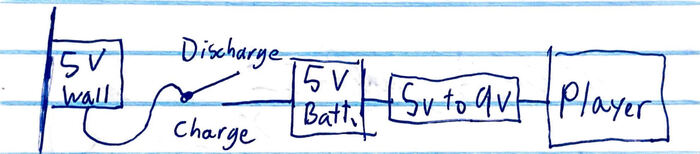
Opening the record player was a great reminder as to why I was doing this. It is not a nice box. It is mostly made of particle board, wrapped in a covering. The platter and needle arm rest on a plywood board, which itself rests on four pine wood blocks that are glued to the particle board. Three of the four screws that hold the plywood to the pine blocks are actually snapped along the shaft, which is very disconcerting. Suffice to say I think it would be fantastic to put all this in a new box, but that is for a later date. The electronics seem fairly straightforward, with a high and ground wire running to the plug in the back. At the start of this project, I thought I had an idea for what to do. A quick google returned this wikihow article, that seemed almost exactly like my plan. Thus, I set out to simply put the battery inbetween the plug in the back and the player itself. The wikihow said that their player runs at 5v, which is also what most batteries run at, so it should work. Below is a few pictures of the record player and its insides, as well as a rough sketch of my plan for how I will try and effect the power flow into the player.
Cutting up wires is my least favorite thing to do. I'm atrocious at stripping wires, and my soldering work is shoddy at best, but luckily my copy editor also has a steady hand and was willing to step in. The input from the outlet adapter now runs to a micro-USB plug, and a USB plug now leads into the record player itself. First, I plugged in the micro-USB wall outlet cable into my battery and.... Fried it. Looking at the AC-DC adapter, I find out that it actually outputs 9v, unlike the wikihow user's 5v player. And that means back to the drawing board.
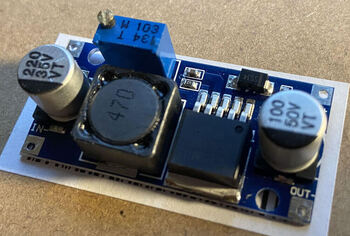
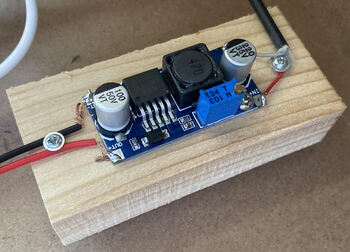
If at first your plan with on hand supplies does not work, try again by spending money. First, I bought a $30 amazon basics battery bank with 5 times the capacity as my old battery. This is a huge plus, although it can't be charged while delivering power. This is quite the downside, yet I'm hoping I can work around it. I'll go over that later. Secondly, I bought these DC-DC step up converters. While before I wanted to have the plug stay the same, this time around I think I'm going to make the battery run on 5v usb power, and then step up the the 5v coming from the battery to 9v before sending it to the record player. The player's plug only supplied 880 mAmps, so I'm hopefull this step up converter will also supply enough amps for the player. Esentially, you can imagine I'm making a battery that can run the record player, and then just hiding it in the same casing as the record player.
Now, we have to get around that recharging/discharging problem. Ideally, we would want to keep the battery topped off all the time by keeping it plugged into the wall. Yet, that is not likely to go over well with this battery. Not only is that bad for the battery's lifespan and capacity, but it is actually impossible for this battery to do. To fix this, I'm going to add a charge switch, which is shown in the diagram below. This switch will toggle wether the usb-c charging the battery is closed or open, essentially allowing me to "unplug" the battery from the wall with just the switch. This, at least for this battery, will also serve to turn on and off the USB output that leads to the 5v-9v converter and then the player itself. This means that our player CAN be turned on when we are not charging, negating the battery problem, but also means we can turn off the player yet keep the battery unplugged so as to extend its life. And, if I ever stumble upon a better battery that can discharge and charge, I can just leave the switch in the charge position all the time, and it will top itself off if it can.
So after attempting to build the thing, I found there was a problem with the Amazon battery. It took the record player too long to turn on for it to recognize it needed to feed power out of the charging port. Because of this, I actually traded that battery with my roommate, who gave me one of the best battery banks I've ever used. It holds even more charge, and also is fed power by a micro USB. To get the player working, I decided to skip the charging niceties like the re/dis-charge switch and the port on the back plate, and instead have a short usb-micro usb cable that I can tuck into the player while I use it, and fish out to charge.
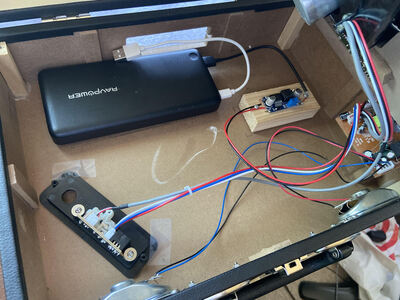
Above is the new layout inside of my player. It now officially works off of a battery! I can take it with me if I wanted to, and in fact I've already used it in my living room without having to plug it in to the wall. I listened to maybe 5 LPs on less than 25% charge without running out of power, so this baby will have no capacity worries in my book. The one problem is that I have to hit a button on the battery to turn it on. This isn't the worse, I put its button in a fairly easy to reach place. Much to improve, but that's for the next section. I am very happy with what I've gotten to work so far!
So gentelthems, we did it. My record player now, after much tinkering, runs on battery power. As cool as this is, I do have more stuff planned to do. Currently, I'm keeping my eye out for a case big enough to mount all this in better. Preferably an old, used suitcase or something. As part of that project, I'll get proper mounting of a backplate including the audio inputs and outputs that are currently stuck inside the case, as well as a female USB-C port to charge it with. The new top plate, which holds the platter and controls and such, will have the battery built into it in such a way that you can hit the battery button right next to the on/off switch. This will also help you check how charged it is. While I'm at it, I'll try to level out the platter and make it wider like I wanted to. But for now, I'm happy with what I've got and figured it was a good note to end on for this page.