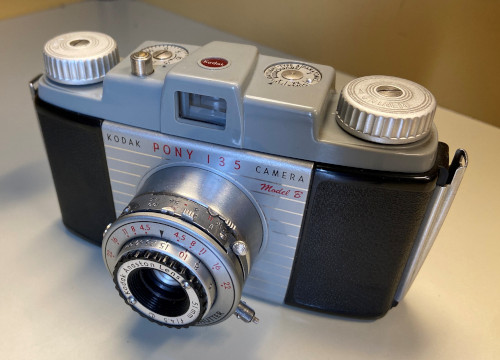
This camera was manufactured in the 1950's, and seems to be the evolutionary link between brownie box cameras and the super advanced SLR film cameras. The manual, while explaining how to focus and use all the settings, mentions that you can set everything to the red letters if you want "box camera simplicity." Its list of features is impressive for a simple machine; it includes a counter to tell you how many shots you have left, a dial you can set to remind you what film you have loaded (although sadly the film types are outdated), and a few primitive ports for flash.
I have not yet gotten a roll of film developed, and it is possible that the camera leaks light, as that seems to be a big problem for the pony. I did try and place some strategic electrical tape, so fingers crossed. From my experience so far, I've enjoyed testing it out around campus. It's kinda fun to have to guess how bright it is, and I've already forgotten half of the photos I've taken, so getting it developed will be like christmas!
Cleaning this camera was a fairly routine affair. Most of the process was guided by this amazing website, and resulted in some amazing views of the mechanisms.
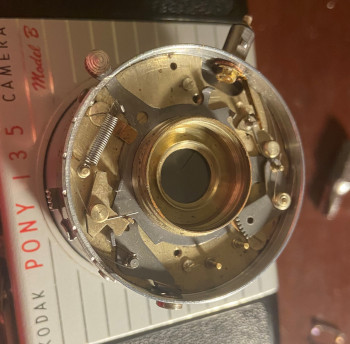
I was very impressed how everything controlling the shutter is built inside the lens piece. The only thing related to the shutter in the actual body is the button to open it, but that is just a lever that triggers the mechanism in the lens! While I was in here, I cleaned all 6 lens-sides with isopropyl alcohol and a microfiber cloth. This camera has 3 lenses, and the third can't be removed, but you can just reach it if you wrap a chopstick with a microfiber cloth. The first critique I have with this guide is how they want you to screw the front lens back in. They recommend a weird tightening of the screws, turn, untighten, turn the other way, etc. But I found it easier to tighten the lens in and just screw into the bottom collar, if you are following along with the other site's instructions. I also stripped the original screws, but they were a standard size and I found replacments at my local Ace hardware.

This bit was the trickiest to work on and make sure it was in working order, as it requires film to be loaded. Essentially, you can't test it until the camera is live. I did a little ill-advised faffing about with the two blank frames of the reel, to make sure it worked. Twisting the winding knob only moves the post the film winds up onto, not the actual mechanism in the picture. The input to that is from a sprocket that rotates with the film. Thus, nothing in this mechanism rotates unless the sprocket turns. But if you just turn the sprocket, it's hard to see if the wind knob is halted after a time. So, like I said, finicky but possible to check if it's working. Something in this mechanism is also loose, and I can hear it click around if I move the camera fast enough. But as far as I can tell, this is not impacting its functionality, so I think we're all good.
Alright, this is my big gripe with the camera. The lens is hard to calibrate. This guide states that to re-install the front lens, "screw the lens in as far as it will go, then back it out one-half turn. This is the starting position for setting the focus." When I tried this, I couldn't shake the feeling it wasn't in focus. And that gut feeling is usually a good sign I should keep working on it. And hence, this photo was taken by my copy editor.

The camera uses 35mm film, and thus the image is projected that large out the back of the camera. The eye is much smaller than 35mm, so I couldn't simply look through the camera to see if it was in focus. Instead, I taped some tissue paper where the film would be (yes I only had pink on hand) and could see a projection on and through it when looking at a well-lit skyline.
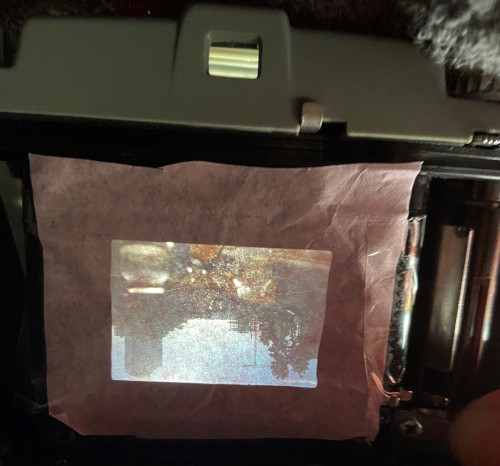
And, I had it! I could see how focused the lens was to calibrate the focusing ring! This was a godsend, as otherwise I'd have to guess, take 24 photos, and hope they came out ok. But now I could be fairly confident that when my camera says it is focused at infinity, it actually is! To double check, I set the camera to its closest focus of 2.5 feet. I couldn't change the scale at all, so if it wasn't in agreement I would be in a bit of a jam. But thankfully that wasn't the case.
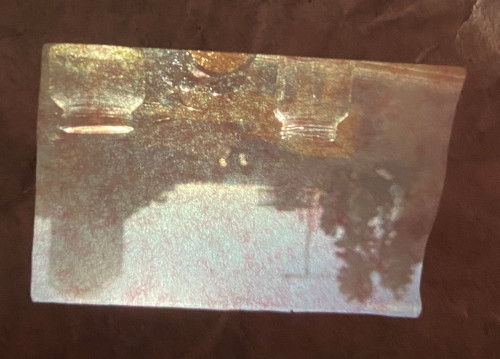
And now I can say that it is in fact focused, even though I can't really look down the barrel. The film will be in the same position as the tissue paper, so that is the image that will be projected onto it. And hopefully, that helps someone else tune their own old camera, even if it does not have SLR.
And now, the best part of this camera, analog scales! Three of them are shown on the lenspiece below.
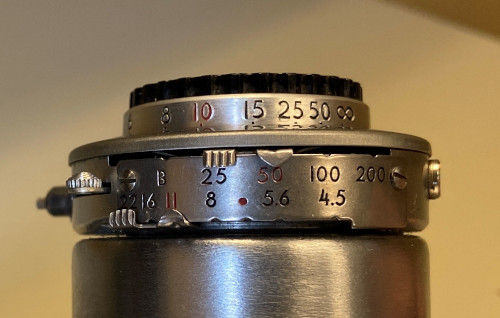
The top scale shown above tells you what is in focus, in feet. The middle scale tells you what the shutter speed is, or more specifically the inverse. 200 means the shutter is open for 1/200th of a second, and 50 means 1/50th, etc. The B setting means that the shutter will be open as long as you hold the button. The lowest scale is related to the diameter of the apature. Basically, how big is the hole you're letting light through? Like speed, this is also inverse, so the larger the number, the smaller that hole. The little knob on the left side is what primes the shutter, and you have to pull it down before you can take a picture.
My favorite part about these scales is the secret fourth one, that you can see on the front of the camera. It's the red ring of numbers around the focusing lens.
These scales are my favorite, because they do passive calculations! I'm not sure what the equation behind them is, but I'm sure there is one. These puppies tell you what range is in focus. Let me explain.
If you have ever heard of a pinhole camera, those work because the aperture is so small that pretty much everything is in focus. This is because the small aperture means that the projection of an image at one edge of the aperture will be at the same spot as the other side. But as you make that aperture wider, the distance between the edges means the projection is liable to smear. You can correct this by focusing, but you'd have to correct diffrent amounts for diffrent distances, so you can't get it all in one shot. This doesn't mean you can only get one distance in focus, though! The smaller the aperture, the larger your range of in focus is, and vice versa. That is what this fourth ring tells you. You find your aperture setting (remember the number is inversely proportional to the diameter) on both sides of the center pointer, and that range on the focusing ring is what will be in focus! If it's dark out, and I need a lot of light, I'll open up the aperture. I then have to be careful, because I'll have a smaller tolerance for the focus. But if I'm outside on a sunny day, I have a setting that lets everything from 6' to infinity be in focus!